Showing posts with label chocolate. Show all posts

Wednesday, March 6, 2013

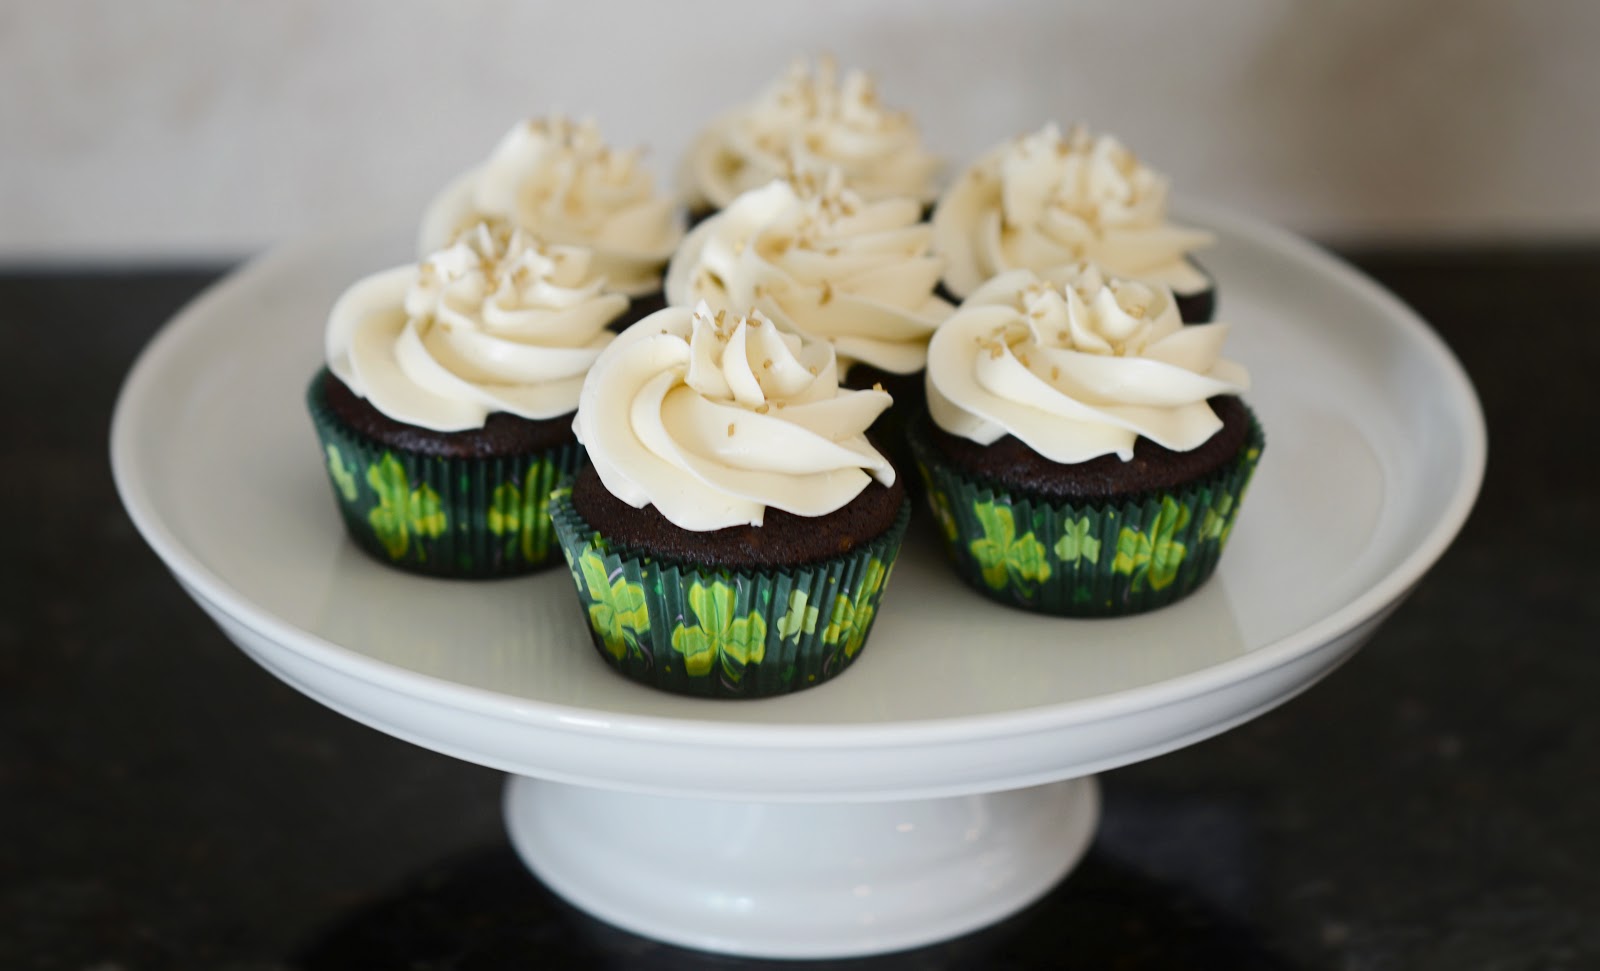
Irish Car Bomb Cupcakes


There's something about boozy desserts.  I gotta admit, I have a blast baking with booze.....so in some ways this is the most wonderful time of the year!  What a better excuse to do some boozy baking than St. Paddy's Day!  Luckily I've got quite a few friends who share in my love of boozy desserts, so these were pretty darn easy to pass around.

This year I've got a couple of new St. Paddy's Day recipes that I want to try, so first up.....Irish Car Bomb Cupcakes from Bakers Royale.  These bad boys are a chocolate cupcake with Guinness and coffee in it.....it makes for an incredibly chocolate-y cupcake.  Fill those bad boys with some Bailey's buttercream frosting, and top off all of that with a whiskey buttercream.  And not just any buttercream, but a Swiss meringue buttercream.  If you have not tried making Swiss meringue buttercream, you don't know what you're missing!  It makes for an amazingly smooth and light frosting.  I prefer this to pretty much every other kind of frosting.  It takes a little bit more work, cooking egg whites and sugar in a double boiler till you hit 150 degrees.....then whipping up in a stand mixer until cooled off and forming stiff peaks (basically marshmallow fluff), then you add all your butter and flavorings.  But seriously.....so.....worth......it.

There's quite of bit of booze in these cupcakes (unless you ask the hubby, who says there's still not enough).  I've always been a fan of Bailey's in frosting.....but the whiskey buttercream was surprisingly delicious!  And powerful enough to make you happy :)

The only note I'll make to this recipe is to watch the bake time of your cupcakes.  The recipe states 35-40 minutes, but in my oven it was closer to 30.

So check out Bakers Royale for the recipe....and Enjoy!


Wednesday, November 28, 2012

Farewell Hostess

Did you grow up with Hostess stuff in the house?  I definitely did!  As I've said before.....my mom has never been much of a baker....so growing up I remember a lot of Hostess fruit pies (yuck), Twinkies (yum), chocolate cupcakes (yummer), and Ding-Dongs (yummiest!).  Well, with all the talk of the Hostess bakery closing, I couldn't stop thinking about making something Hostess.  I probably would have just gone to the grocery store and bought something, but apparently people decided to make a run on the stores and start selling everything on Ebay (seriously....you can buy Twinkies on Ebay....crazy!)......so, I decided to just do it myself!

I decided that I would make these as my kiddo dessert for Thanksgiving.....I mean, who doesn't love a chocolate cupcake??  Luckily I had saved a recipe for "Faux-stess" cupcakes from Confessions of a Cookbook Queen, and believe me.....these did not disappoint!  Every single one of them was devoured!

The best part for me (because I didn't have too much time to do these)?  The recipe uses a boxed Devil's Food cake mix!  Now, I normally would much rather make cupcakes from scratch....and there are some recipes for Faux-stess cupcakes that are from scratch......but I just decided to go with it, since I was under a time crunch.  Then you fill the cupcakes up with a vanilla frosting that I thought tasted a lot like the original.  "Only better", according to the hubby.

And then there's the top of the cupcake.  A can of chocolate frosting!  Seriously!  Did you know that you can nuke a can of frosting, then dip a cupcake in it and voila!  Easy peasy chocolate ganache?  I realize it's not the real deal....but come on!  It tastes just like it!  And it was exactly the right topping for these cupcakes!  Such a great trick to know.......I'll be using that again!

Check out Confessions of a Cookbook Queen for the recipe.....and Enjoy!  Now I've got to give homemade Ding-Dongs and Twinkies a try!

Wednesday, July 11, 2012

Knock You Naked Brownies


Hee hee.......you gotta love a name like that right?

The Pioneer Woman has done it again!  Another fantastic recipe, that couldn't be easier to throw together.  German Chocolate cake mix to make a brownie??  Who would have thunk??

This recipe only has a handful of ingredients.....but you will make your friends super duper happy if you make this, I promise!!  We ended up serving it on 4th of July topped with some homemade vanilla bean ice cream and whipped cream.  Totally over the top, and totally delicious!  Calories consumed on a holiday don't count, right?

RIGHT??

Check out The Pioneer Woman for the recipe.....and Enjoy!

Monday, April 30, 2012

Biscoff Pretzel Bites

Today is my little man's 3rd birthday!  I can't believe that he's already three years old.....and I also can't imagine life without him.  He's definitely a clown and a total blast to be around.....unless he's being grumpy......then he's super G-R-U-M-P-Y (just ask everyone at Kindergarten pickup that see him right after he wakes up from a nap) and stubborn.  Did I mention he can be stubborn?  I've been itching to start potty training for ages, but he just would not have it.  So, I would tell him that when his birthday comes around, we would start, because three year olds use the potty.  His response?

"I'll be one!"

Well.....we've started today.....Mommy can be just as stubborn!

So how about these little treats for something festive?  I mean, who can resist the pull of rainbow sprinkles?  And wait till you hear what are in these pretzels sandwiches......wait for it........Biscoff!!  Oh yeah!  They are fantastic!  So simple, and absolutely delicious!  I brought these to three different get togethers, and they were a huge hit everywhere we went.  And did I mention that they are super easy to throw together?  Yup, these might just be a perfect little bite.

Check out the awesome Two Peas and Their Pod for the recipe.....and Enjoy!!

My little monkeys enjoy sprinkles just as much as Mommy does!
This post is linked to:
Mix it Up Monday - What Makes You Say Mmmmm? Monday  - T' Time - Crazy Sweet Tuesday - Tasty Tuesday - Tip Me Tuesday - Tuesday Talent Show - Mrs. Fox's Sweet Party - Link It Up Wednesday - Cast Party Wednesday - Sweet Treats Thursday - Full Plate Thursday - Bake with Bizzy - Kitchen Fun and Crafty Friday - Friday Favorites - Feed Your Soul - Friday Free-For-All - Anything Goes Linky - Friday Food - Fun Stuff Fridays - Sweets for a Saturday - Seasonal Inspiration - Sweet Tooth Friday - Scrumptious Sunday

Sunday, April 15, 2012

Club: Baked - Grasshopper Bars

I'm so excited for this round of Club: Baked for two reasons......I'm hosting, and I got to pick one of my favorite desserts in the book (Baked Explorations)......Grasshopper Bars!  When I was in Charleston last summer and went to Baked, the Grasshopper Bars were my favorite thing that I tried......delicious!  

A brownie base, topped with a mint flavored buttercream, all topped with a chocolate ganache.  Each bite has an amazing mint chocolate taste......if you're a fan of mint chocolate chip ice cream, you will freak out over these bars!  I think that my bars came out tasting exactly like what I remembered....but I had a tricky time getting a nice clean looking bar.  The only change I had to make when I was baking was that I added a few drops of green gel food coloring to the mint buttercream.  The hubby bought a clear creme de menthe for me (he said there was a green one as well, but he went with the clear), and I wanted to get that mint green coloring in the buttercream.

Grasshopper Bars

Ingredients

For the Brownie Base
3/4 cups flour
1/2 teaspoon salt
1 tablespoon dark unsweetened cocoa powder (like Valrhona)
5 ounces good quality dark chocolate (60 to 72%), coarsely chopped
1/2 cup (1 stick) butter, cut into 1 inch cubes
3/4 cup sugar
1/4 cup firmly packed light brown sugar
3 large eggs, at room temperature
1 teaspoon vanilla extract

For the Buttercream
3/4 cup sugar
2 tablespoons flour
3/4 cup milk
2 tablespoons heavy cream
3/4 cup (1 1/2 sticks) butter, softened but still cool, cut into small cubes
3 tablespoons creme de menthe
1 teaspoon peppermint extract

For the Chocolate Glaze
6 ounces good-quality dark chocolate (60 to 72%), coarsely chopped
1 teaspoon light corn syrup
1/2 cup (1 stick) unsalted butter, softened, cut into cubes

Make the Brownie Base
1. Preheat the oven to 325 degrees F.

2.  Butter the sides and bottom of a glass or light colored metal 9-by-13-inch pan.  Line the bottom with a sheet of parchment paper, and butter the parchment.  In a medium bowl, whisk together the flour, the salt, and cocoa powder.


3.  Configure a large size double boiler.  Place the chocolate and the butter in the bowl of the double boiler and stir occasionally until the chocolate and butter are completely melted and combined.  Turn off the heat, but keep bowl over the water of the double boiler and add both sugars.  Whisk the sugars until completely combined.  Remove the bowl from the pan.  The mixture should be at room temperature.

4.  Add three eggs to the chocolate/butter mixture and whisk until just combined.  Add the vanilla and stir until combined.  Do not overbeat the batter at this stage or your brownies will be cakey.

5.  Sprinkle the flour/cocoa/salt mix over the chocolate.  Using a spatula (do not use a whisk) fold the dry ingredients into the wet until there is just a trace amount of the flour/cocoa mix visible.

6.  Pour the batter into the prepared pan, smooth with an offset spatula, and bake for approximately 12 to 15 minutes, rotating halfway through the baking time.  The brownies should be just a tad underdone (not too gooey, but ideally, just 1 minutes from being cooked through completely).  A toothpick inserted into the brownies at an angle should contain a few loose crumbs.  Remove the brownies from the oven and let cool completely white you make the creme de menthe filling.

Make the Buttercream
7.  In a medium heavy-bottomed saucepan, whisk the sugar and flour together.  Add the milk and cream and cook over medium heat, whisking occasionally until mixture comes to a boil and has thickened, 5 to 7 minutes.

8.  Transfer the mixture to the bowl of an electric mixer fitted with the paddle attachment.  Beat on high speed until cool.  Reduce the speed to low and add the butter and mix until thoroughly incorporated.  Increase the speed to medium-high and beat until filling is light and fluffy.

9.  Add the creme de menthe and peppermint extract and mix until combined.  If the filling is too soft, chill slightly in the refrigerator and then mix again until it is the proper consistency.

10.  If the filling is too firm, place the bowl over a pot of simmering water and re-mix to proper consistency.  Spread the filling evenly across the top of the brownie later and place the pan in the refrigerator, for a minimum of 45 minutes, while you make the chocolate glaze.


Make the Chocolate Glaze
11. In a large non-reactive metal bowl, combine the chocolate, corn syrup, and butter.  Set the bowl over a saucepan of simmering water and cook, stirring with a rubber spatula, until the mixture is completely smooth.  Remove the bowl from the pan and stir vigorously for 1 minute to release excess heat.

12. Pour the mixture over the chilled creme de menthe layer and use an offset spatula to spread it in an even layer.  Place the pan back in the refrigerator or 1 hour, or until the glaze hardens.

13. Remove the pan from the refrigerator; wait about 15 minutes for the glaze to soften slightly, and cut the bars with a warm knife.  Cut into squares and serve immediately.

14.  These bars can be stored in the refrigerator, tightly covered, for up to 4 days.

Click here to see the other baker's results.....and Enjoy!

This post is linked to:
Tuesday, February 21, 2012

TWD: Chocolate Truffle Tart

Welcome to round 2 of Tuesdays with Dorie, as we bake our way through Baking with Julia.  For this round we are tackling the Chocolate Truffle Tartlettes......or in my case, a Chocolate Truffle Tart.  I didn't have any small tart rings, just one big 10" one.....so a giant super-chocolately tart is what I got!

I made the chocolate tart crust in my food processor and let it chill in the fridge overnight before I rolled it out, baked it, and worked on the filling.  I had a little trouble rolling out the dough without it cracking....if you look closely you can probably still see some cracks, but in the end it did come together and bake beautifully.  The filling has bittersweet chocolate, milk chocolate, white chocolate, and chopped up biscotti, and came out of the oven with a beautiful glossy finish.......the tart is seriously chock-full of yumminess!

The hubby and I each had a small sliver for dessert with some fresh whipped cream.....this is definitely not a dessert that you'll be able to eat a lot of.....it's truly rich and decadent.  That being said......the hubby, who is not a lover of all things chocolate......loved this dessert, and had it not been 10 pm already, probably would have gone back for more!  That's enough for me.....it's a winner!!

For the recipe, please check out our hosts for this round, Jaime at Good Eats and Treats or Jessica at Cookbookhabit, and click here to see all the other baker's results.....Enjoy!!

This post is linked to:
Crazy Sweet Tuesday - Tasty Tuesday - T' Time - Tuesday Talent Show - These Chicks Cooked - Mrs. Fox's Sweet Party - Link It Up Wednesday - Cast Party Wednesday - Bake with Bizzy - Full Plate Thursday - Sweet Treats Thursday - It's a Keeper Thursday - Show Off Your Stuff - Kitchen Fun and Crafty Friday - Friday Favorites - Friday Free-For-All - Fusion Friday - Anything Goes Linky - Friday Food - Fun Stuff Friday - Sweets for a Saturday - Seasonal Inspiration - Sweet Indulgences Sunday - A Themed Baker's Sunday


Tuesday, February 7, 2012

The Search for the Ultimate Chocolate Cake


This round of the Crazy Cooking Challenge, hosted by Tina over at Moms Crazy Cooking, is looking for the ultimate Chocolate Cake.  Yum!  One of my favorite things!

I had planned on trying out a made from scratch chocolate cake (can't give away which recipe since I'll be trying it soon), but as soon as I saw the Toasted Marshmallow Hot Fudge Cake from Confessions of a Cookbook Queen....I knew I had my cake.  Just the words "toasted marshmallow" and "hot fudge" had me drooling.....but put them together with a chocolate cake.......yes, please!!

And this recipe could not be any easier!  Make a chocolate cake from a box mix.......poke holes in the cake once it's out of the oven and drizzle a jar of hot fudge sauce over the top.  The top with marshmallow fluff and put back in the oven until the marshmallow gets nice and toasty.  Easy Peasy!


You'll end up with a ooey gooey chocolate cake with toasted marshmallow frosting.  This one was right up my alley!  Enjoy!!

Toasted Marshmallow Hot Fudge Cake

1 box of chocolate cake mix
eggs called for on box
oil called for on box
water called for on box
1 jar of hot fudge sauce
2 (7 oz.) jars of marshmallow fluff

Preheat your oven to 350 degrees F.

Prepare your chocolate cake using the directions on the back of the box, and pour into a greased and floured 9x13 cake pan.

Bake cake according to the directions on the box.  When cake is almost done, gently warm up the jar of hot fudge until it is pourable. When cake is done, take it out of the oven, and turn up the temperature of your oven up to 400 degrees F.

While the cake is still hot, use the handle of a wooden spoon to poke holes all over the cake, then pour the hot fudge sauce all of over the cake, letting it soak into the holes.

Place dollops of the marshmallow fluff all over the cake, then wait a couple of minutes for the fluff to melt a bit.  Spread the marshmallow fluff evenly all over the cake, then place the cake back in the oven.  Bake until the marshmallow topping begins to get browned and toasty.  Remove from oven and try to not eat it all in one sitting.

Photobucket

Check out what everyone else has made, and vote for your favorite!

This post is linked to:
Crazy Sweet Tuesday - Link Party - Tuesday Talent Show - Tea Party Tuesday - T' Time - Tasty Tuesday - Link It Up Wednesday - Mrs. Fox's Sweet Party - These Chicks Cooked - Cast Party Wednesday - Famous Linkz - Full Plate Thursday - Sweet Treats Thursday - It's a Keeper Thursday - Show Off Your Stuff - Friday Favorites - Feature Friday Free-for-all - Anything Goes Linky - Fusion Fridays - Friday Food - Fun Stuff Friday - Kitchen Fun and Crafty Friday - Seasonal Inspiration - Sweets for a Saturday - Sweet Indulgences Sunday

Thursday, January 5, 2012

Chocolate Whoopie Pies


Oh my!  How did I ever let this one slip by?  As I was going through some old pictures I found this one of Chocolate Whoopie Pies with Dulce de Leche frosting that I made back in the Fall.  These were a huge hit, they were insanely delicious, and yet I somehow completely forgot to post them.  Wow!  My bad!

I had some leftover Dulce de Leche Buttercream Frosting after making a batch of Tres Leches Cupcakes (which you need to make if you haven't yet!).  I couldn't bear the idea of tossing the frosting, bit I wasn't in the mood for more cupcakes.  So, after thumbing through a bunch of my cookbooks, I settled on the Chocolate Whoopie Pies from Baked Explorations (you can't go wrong with those guys!).  Their recipe called for a Swiss Vanilla filling, but I used my leftover Dulce de Leche buttercream frosting, and it went together perfectly!  The whoopie pies are a deep dark chocolate, and I think for my first time making whoopie pies, they don't look half bad!  These got rave reviews from everyone, including the hubby!

Check out the recipe for the Whoopie Pies at Modern Domestic, and the frosting recipe at Bakers Royale......and Enjoy!

This post is linked to:


Sunday, January 1, 2012

Club: Baked - Devil's Food Cupcakes

Happy 2012!  Hope you had a Happy New Year's!  We were very low key last night......but I did manage to sneak in some baking yesterday!  After missing the last two Club: Baked assignments, I was determined not to miss another!  This time around, Natalie, over at Just About Food, has selected Devil's Food Cake with Angel Frosting.  As I do with most of the cake recipes selected, I opted to make cupcakes.  And let me tell you......these were perfect, if not ideal, as cupcakes!!

The chocolate cupcakes are super chocolate-y, thanks to not only dark cocoa powder and dark chocolate, but the addition of strong coffee or espresso to boost the chocolate flavor.  These cupcakes are tender and moist.....they just might end up being my go-to chocolate cupcake!

Now let's talk about this frosting.  It might not be everyone's favorite, but for someone like me, that absolutely loves marshmallow....this Angel Frosting is absolutely fabulous!  It truly just tastes like marshmallow fluff, with a little vanilla bean loveliness.  And the best part?  There's no butter in this frosting!  Yep!  Just sugar.  Makes me happy!

Give these a try......you'll love them!

Check out Club: Baked for the other baker's results.....and got to Just About Food for the recipe......Enjoy!

This post is linked to:
Sweet Indulgences Sunday - Tuesday Talent Show - Link Party - Crazy Sweet Tuesday - Tea Party Tuesday - Tasty Tuesday - T Time - These Chicks Cooked - Link It Up Wednesday - Cast Party Wednesday - Bake with Bizzy - Full Plate Thursday - It's a Keeper Thursday - Sweet Treats Thursday - Show Off Your Stuff - Fusion Fridays - Anything Goes Linky - Feature Friday Free For All - Friday Favorites - Friday Food - I'm Lovin' It - Fun Stuff Fridays - Sweets for a Saturday - Seasonal Inspiration - A Baker's Themed Sunday

Friday, December 16, 2011

Spreading the Christmas Cheer

The hubby was on Cloud 9 last night!  We were at the Mark and Brian Christmas show last night (the morning show hosts on 95.5 for anyone not in LA), and thanks to our awesome friend Preva, the hubby got to meet his guitar idol!  The hubby is a musician.......he's been playing guitar forever....and growing up, Steve Lukather (guitar player for Toto) was always his guitar god.  He was terrified of meeting him.....worried he would say something stupid, or worse yet, that Steve wouldn't be a nice guy. Well, it couldn't have gone better!  They chatted for a while, did a couple of bro hugs, got to talk gear......and the hubby looked like a kid on Christmas morning who just got everything they had asked for!  So thank you to Steve Lukather, for being a great guy....and a huge hug and thank you to Preva for making it happen!

Have you started making all of your goodies for Christmas Eve and Day yet?  I'm planning on starting this weekend...still trying to decide everything I'll do.  One thing I made, and really like, is the Cake Batter Chocolate Bark, from How Sweet  It Is.  You pretty much can't go wrong with anything from her site, and this one is no exception.

Can you melt chocolate in the microwave?  Then you need to make this!  Couldn't be easier.....you just need to give yourself time for the layers to harden up (sticking it in the freezer will speed it up).  I went ahead and used Christmas colored sprinkles, but check out Jessica's pictures with the rainbow sprinkles.....love it!

The cake batter flavor isn't overpowering.....so if you're not looking for it, you may not even notice it.  But if you're a fan, you'll notice it for sure, and you'll love it.  Just make sure to use some good quality chocolate, since that;s the only ingredient, you'll want it to shine!

Well, that's it......I'm off to start putting my list together of what I want to get done in the kitchen this week......and maybe try to get my Christmas cards in the mail, finally.

Check out How Sweet It Is for the recipe.....and enjoy!

This post is linked to:
Fusion Fridays - I'm Lovin' It - Fun Stuff Fridays - Anything Goes Linky - Sweet Tooth Friday - Friday Favorites - Seasonal Inspiration - Sweets for a Saturday - Sweet Indulgences Sunday - Monday, Mmmm.......Dessert - Tea Party Tuesday - Crazy Sweet Tuesday - Tuesday Talent Show - T' Time - Tasty Tuesday - These Chicks Cooked - Link It Up Wednesday - Anything Goes Linky - Sweet Treats Thursday - Full Plate Thursday - Turning the Table Thursday - Show Off Your Stuff - Friday Food

Thursday, December 15, 2011

MSCC: Red Velvet Cupcakes

This month's selection for the Martha Stewart Cupcake Club (MSCC) was picked by Cindy over at Everyday Insanity, and she has selected Red Velvet Cupcakes!  I think that has to be one of everyone's favorite cupcakes, I know it's one of mine!

As you can see from the picture, these cupcakes really do retain their red color.  According to Martha, there is a chemical reaction between the vinegar and baking soda that are added at the end of the mixing, and this enhances the red coloring.  They were definitely more vibrant than some of the other red velvet recipes I've tried.

I brought these to a friend's Christmas party, and they were a hit!  The buttermilk in the recipe adds a little tang to these that I loved.

The only change I made was that I didn't use the normal cream cheese frosting that is customary with red velvet.  It's not my favorite, and since we were bringing this to a party with tons of kiddos, I figured a vanilla frosting would be a bigger hit.  I went ahead and used Our Best Bites perfect cupcake frosting.  If you haven't tried it yet, please do the next time you make cupcakes.....it's amazing!!  When it's done it tastes like a cross between buttercream and whipped cream.  Truly one of my favorite frostings!

Check out the other baker's cupcakes here, and go to Everyday Insanity for the recipe.......and Enjoy!

This post is linked to:
Sweet Treats Thursday - It's a Keeper Thursday - Full Plate Thursday - Turning the Table Thursday - Bake with Bizzy - Show Off Your Stuff - Fusion Fridays - I'm Lovin' It - Fun Stuff Fridays - Anything Goes Linky - Sweet Tooth Friday - Friday Favorites - Seasonal Inspiration - Sweets for a Saturday - Sweet Indulgences Sunday - Monday, Mmmm.......Dessert - Tea Party Tuesday - Crazy Sweet Tuesday -  Tuesday Talent Show -  T' Time - Tasty Tuesday - These Chicks Cooked - Link It Up Wednesday - It's a Celebration


Tuesday, November 15, 2011

Club: Baked - Buckeyes

This round of Club: Baked was selected by Karen over at Karen's Cookies Cakes and More, and she selected Buckeyes.  Buckeyes are a peanut butter ball, that when dipped in chocolate, is said to resemble a horse chestnut (a Buckeye tree).

I had to admit that my Buckeyes are not true Buckeyes.  You see, the hubby is just not a lover of peanut butter and chocolate together (yeah, he's one of those people).  He loves peanut butter, and he loves chocolate, but together, he's just not a fan.  I actually considered not making these for a minute, since I didn't want to end up eating all of these myself....and then I remembered.....

I had a jar of Biscoff spread in the pantry!!  You know what Biscoffs taste like right?  Kind of a combination of gingersnaps and a cinnamon graham cracker......super delicious!  It pretty much has the same consistency as peanut butter....why not give it a try?

You know what?  They're pretty darn yummy!  You definitely get that delicious Biscoff taste coming through....and it tastes delicious with the chocolate coating.

I think the trickiest part of these is dipping them in the chocolate and leaving a part of the inside exposed.  I'm so used to making cakeballs and truffles, that I wouldn't even be thinking and start coating the whole thing.  Oops!

Give these a try for a holiday party....the recipe will make a ton of them!  I did a 1/2 recipe, and still ended up with about 30 of them!

Go to Club: Baked to check out the other baker's results.....and check out Karen's Cookies Cakes and More for the recipe......and Enjoy!

This post is linked to:
Crazy Sweet Tuesday - Tasty Tuesday - Tuesday Talent Show - Tea Party Tuesday - Anything Goes Linky - These Chicks Cooked - Link It Up Wednesday - Full Plate Thursday - Sweet Treats Thursday - It's a Keeper Thursday - Show Off Your Stuff - Fusion Fridays - Friday Favorites - Sweet Tooth Friday - Friday Food - Sweets for a Saturday - Seasonal Inspiration - Sweet Indulgences Sunday - Monday, Mmm....Dessert

Wednesday, November 9, 2011

Oreo Turkeys


Do you know what you're making for Thanksgiving yet?  We go to my brother-in-law's in Newport Beach every year, and I'm the dessert-bringer (big surprise, right?).  We've got a huge crowd there, so there's always tons of food.  I think I ended up bringing five different things last year.

One of the things I made last year were these Oreo and candy turkeys to use as placecards for the kid's table (there are around 18  kids at our Thanksgiving).  I made little toothpick flags with the kids'  names and poked that into the chocolate and placed them at the table.  Because I made these pretty late the night before Thanksgiving, I wasn't too concerned with making all the details perfect (Ugh, those feet!).....but you know what?  The kids loved them!  Oreos and candy glued together with chocolate?  What's not to love?

Do you want to give these a try?  Go to Our Best Bites for a fantastic step-by-step of how to put these together......Enjoy!

Now pardon me while I go try to figure out what I'm bring this year.......

This post is linked to:
These Chicks Cooked - Full Plate Thursday - Sweet Treats Thursday - Turning the Table Thursday - It's a Keeper Thursday - Show Off Your Stuff - Sweet Tooth Friday - I'm Lovin' It - Anything Goes Linky - Friday Favorites - Fusion Fridays - Sweets for a Saturday - Sweet Indulgences Sunday - Seasonal Inspiration - Sharing Sundays - Monday, Mmmmm.....Dessert - Tea Party Tuesday - Tuesday Talent Show - Tasty Tuesday - Crazy Sweet Tuesday - Thanksgiving Traditions - Link It Up Wednesday - A Themed Baker's Sunday

Monday, November 7, 2011

Graham Cracker Toffee Bark

Do you ever find yourself in the kitchen, just itching to make something?  It happens to me a lot......but this time I was stuck at home with a grumpy 2 1/2 year old with a cold.  I needed something sweet to cheer us up!  But, I didn't want to go to the store for anything, so I had to make something with what I had.

I have seen a ton of recipes over the years for saltine toffee bars.....and I figured I should give them a try.  Only problem.....I didn't have any saltines!  Luckily, I found that there were also a ton of similar recipes out there using graham crackers instead.  Alrighty then......let's do this!!

It seems as though this recipe has been around for a long time.....people were mentioning that their moms and gramdmas made this.  Well, I had never had it before.....but now that I've made it, it's going to be sticking with me!  Graham crackers that soak in a toffee-ish syrup....covered in chocolate and then sprinkled with nuts.....yum!

While my sick little guy was being distracted by a Team Umizoomi episode, I was able to quickly threw this together.  It's not even one that requires your undivided attention for long.....just a little bit on the stovetop.....it would be a great recipe to have the kids help you with (except for a sick 2 1/2 year old with a very runny nose ;).

You can easily change up this recipe to use whatever you've got in the house.  For my chocolate layer, I used a combination of semi-sweet chocolate chips and milk chocolate.  I topped mine with chopped pecans....simply because that's what I had.  I think any nut would be fantastic on top of these.....or how about some crushed candy cane for the holidays?

CHOCOLATE GRAHAM CRACKER TOFFEE BARK
from About.com Home Cooking

1/2 pound (2 sticks) butter
1/4 cup brown sugar
1/4 cup granulated white sugar
1/2 box (about) graham crackers (not crumbs)
2 cups semi-sweet chocolate chips
1 cup chopped nuts

Preheat oven to 350 degrees.  Line a jelly roll pan, or a cookie sheet with a large lip with non-stick foil. Lay out your graham crackers on the pan in a single layer, side by side, filling the entire pan.  Be sure to fit any spaces with a piece of a graham cracker.

In a saucepan over medium heat, melt the butter, then add the sugars and stir to combine.  Allow the mixture to come to a boil, then reduce the heat and let the mixture bubble gently for 4 more minutes.  Remove the pan from the heat and carefully pour the mixture over the graham crackers in the pan.  Spread the mixture so that it covers the graham crackers evenly.  Place in the oven and bake for 10 minutes.

After 10 minutes, remove the pan from the oven and let it rest until the bubbling subsides (this will take only a minute or two).   Sprinkle the chocolate chips over the graham crackers and let it sit for a minute or two (so that the chocolate starts to melt).  Spread the chocolate so that it forms an even layer over the graham crackers, then top by sprinkling the chopped nuts evenly over the chocolate.  You may want to gently press the nuts into the melted chocolate, so that the nuts stick better when the chocolate firms.

Let the pan come to room temperature, then place in the refrigerator for a couple of hours until very firm.  Peel the foil from the back and break into pieces.  Keep in refrigerator until ready to serve.

Enjoy!

This post is linked to:
Monday, Mmm....Dessert - Tea Party Tuesday - Tuesday Talent Show - Tasty Tuesday - T' Time - Crazy Sweet Tuesday - These Chicks Cooked - Bake with Bizzy - Full Plate Thursday - Sweet Treats Thursday - Turning the Table Thursday - It's a Keeper Thursday - Show Off Your Stuff - Sweet Tooth Friday - I'm Lovin' It - Anything Goes Linky - Friday Favorites - Fusion Fridays - Sweets for a Saturday - Sweet Indulgences Sunday - Seasonal Inspiration

Sunday, September 18, 2011

S'mores Bars

Who doesn't love a s'more?  I mean graham cracker, chocolate, marshmallow......what's not to love?  Ok, except for our 5 year old who doesn't seem to understand that there is a world of dessert out there besides his Oreos, vanilla ice cream, and sprinkles.

These S'mores Bars from Endless Simmer take all of those great flavors and put them in an easy to assemble bar form.  I gotta say.....one of my favorite flavors is toasted marshmallow......so yummy!  And the chocolate center in these is almost fudgy in its ooey gooeyness.  Luckily this recipe makes an entire 13x9 pan.......plenty to share and keep some for yourself!

Check out Endless Simmer for the recipe.....and Enjoy!!

This post is linked to:
Sweet Indulgences Sunday - Mingle Monday - Monday, Mmmm.....Dessert - Tuesday Talent Show - Tasty Tuesday - Crazy Sweet Tuesday - These Chicks Cooked - Cast Party Wednesday - Turning the Table Thursday - Bake with Bizzy - Sweet Treats Thursday - Full Plate Thursday - Show Off Your Stuff - Sweet Tooth Friday - Friday Favorites - Fusion Fridays - I'm Lovin' It - Fat Camp Friday - Friday Food - Sweets for a Saturday - Any Linky Goes - It's a Celebration

Thursday, September 1, 2011

Club: Baked - Boston Cream Pie (Cup)cakes


It's time for our next installment of Club: Baked!  This time Brooke from Brooke's Bountiful Kitchen has selected Baked's Boston Cream Pie Cake.  And like the last Club: Baked round, I decided to turn the cake into cupcakes.

My previous experience with Boston Cream Pies was only of the frozen variety.  Did anyone else ever have the frozen (I believe Sara Lee) Boston Cream Pies that your Mom would set out at dinnertime so that it was thawed out in time for dessert?  Since that's the only time I've ever tried this, I wasn't sure what to expect.....well the Baked boys definitely kicked this dessert up a notch (or two).

Take a vanilla sponge cake, throw in a layer of vanilla pastry cream, and one of chocolate pastry cream.....then top off with a rich chocolate ganache......oh man!  You've got trouble!

When I first thought about doing this recipe as cupcakes, I thought "no biggie!  I'll just fill the cupcakes with pastry cream and cover with the ganache."  Well, on reading the recipe again, I realized that there was both vanilla and chocolate pastry creams alternating between the 4 layers of the cake.  Alrighty.....slight change of plan.......I still did a cupcake.....but after baking, I removed the cupcakes from their liners, sliced the cupcakes into 3 layers, and did a layer of vanilla pastry cream, and then a layer of chocolate pastry cream.  The cupcake stacks then found a home in a new cupcake liner, and then the chocolate ganache was then poured over the top of the cupcake.  This was a little more involved than just filling and frosting a cupcake, but I was bound and determined to make these cupcakes......no turning back!


These cupcakes were a hit both at our house with my dear friend (as official taste tester) Lisa's family.  One of these days I'll actually try making the cake version (and try not to eat it all myself).

Check out Brooke's Bountiful Kitchen for the recipe....and check out Club: Baked to see the other baker's results!  Enjoy!!

This post is linked to:

Sunday, August 28, 2011

Chocolate Caramel Bars

This is one of those desserts that I was sure was going to be great, but for one reason or another, kind of missed the mark.  I mean chocolate, caramel, and a cookie crust.....sounds great, right?

My main problem with these was really my fault.  I had tried putting these together while my boys were busy playing.  Trying to keep an eye on them and an eye on the temperature of my caramel caused me to overcook the caramel by a couple of degrees.  Rather than ending up with a yummy, chewy caramel layer....I had some spots that were rather crunchy and biting into it kind of caused the whole bar to start falling apart.

The hubby was not a huge fan of the chocolate layer (although I loved it)......he thought it was a bit too chocolate-y (which is what a non-chocolate lover would say!!).

Although I screwed these up, I would definitely try them again......Kierste from Brown Paper Packages raved about them....so I think I just missed the mark.

Check out Brown Paper Packages for the recipe.....and Enjoy!!

Monday, August 1, 2011

Club Baked: Minty Goodness!

This round of baking from Club Baked features a recipe I was really looking forward to trying, Chocolate Mint Thumbprint Cookies.  These little beauties are chocolate mint cookies filled with a white chocolate mint ganache......yum!!

The deep dark chocolate-y cookies actually have some melted Andes chocolates in the batter to give them a delicious (and not over-powering) minty taste!  These cookies actually have a minty flavor that reminds me of Girl Scout Thin Mints....which is a great thing!

After you get the dough together, you're going to need to refrigerate it so that it firms up a bit.  When you get the dough out of the refrigerator to get ready to bake, the dough has the consistency of chocolate truffles......I was very curious how it would bake up, because it was very unlike any cookie dough I had used before.  After rolling it in some sanding sugar and baking (watching very closely and taking them out at the first sign of cracking), I had my answer.....they are fantastic!  Even before adding the white chocolate mint ganache filling they were delicious.......amazingly tender and a lovely chocolate-mint combination.

Because I was so fond of the cookies before I even put together the filling......I cut back a little on the peppermint extract that gets added to the white chocolate ganache.  The recipe calls for 1/2 teaspoon......I think I ended up using about 1/4 teaspoon, so that you could taste the mint, but it was not crazy overpowering.  I loved how it came out!

Check out Random Acts of Food for the recipe.....and check out Club Baked for all of the other bakers' results....and Enjoy!!

This post is linked to:
Monday, Mmmmm......Dessert
These Chicks Cooked
Cast Party Wednesday
Full Plate Thursday
Turning the Table Thursday
Sweet Treats Thursday
Show Off Your Stuff
Fresh Food Friday
Fat Camp Friday
Friday Food
Sweet Tooth Friday
Sweets for a Saturday
Sweet Indulgences Sunday